Hello, world!
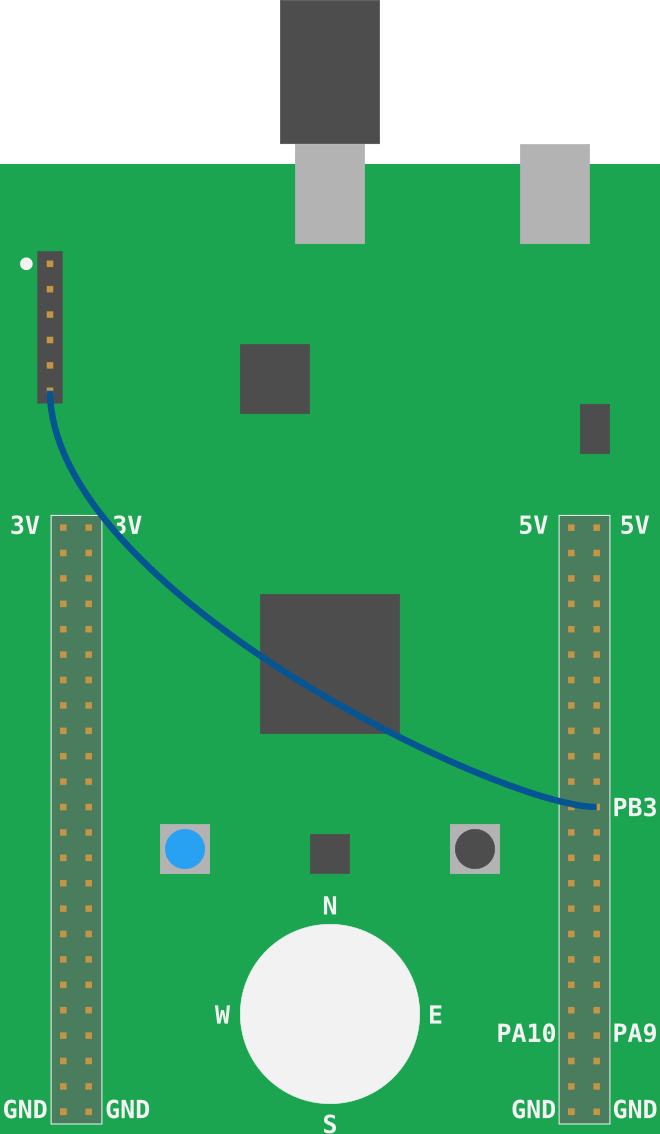
HEADS UP The “solder bridge” SB10 (see back of the board) on the STM32F3DISCOVERY, which is required to use the ITM and the
iprint!macros shown below, is not soldered by default (see page 21 of the User Manual). (To be more accurate: this actually depends on the board revision. If you have an old version of the board as the old User Manual said, the SB10 was soldered. Check your board to decide whether you need to fix it.)
TL;DR You have two options to fix this: Either solder the solder bridge SB10 or connect a female to female jumper wire between SWO and PB3 as shown in the picture below.

Just a little more of helpful magic before we start doing low level stuff.
Blinking an LED is like the “Hello, world” of the embedded world.
But in this section, we’ll run a proper “Hello, world” program that prints stuff to your computer console.
Go to the 06-hello-world directory. There’s some starter code in it:
#![deny(unsafe_code)]
#![no_main]
#![no_std]

#[allow(unused_imports)]
use aux6::{entry, iprint, iprintln};

#[entry]
fn main() -> ! {
    let mut itm = aux6::init();

    iprintln!(&mut itm.stim[0], "Hello, world!");

    loop {}
}
The iprintln macro will format messages and output them to the microcontroller’s ITM. ITM stands
for Instrumentation Trace Macrocell and it’s a communication protocol on top of SWD (Serial Wire
Debug) which can be used to send messages from the microcontroller to the debugging host. This
communication is only one way: the debugging host can’t send data to the microcontroller.
OpenOCD, which is managing the debug session, can receive data sent through this ITM channel and redirect it to a file.
The ITM protocol works with frames (you can think of them as Ethernet frames). Each frame has a
header and a variable length payload. OpenOCD will receive these frames and write them directly to a
file without parsing them. So, if the microntroller sends the string “Hello, world!” using the
iprintln macro, OpenOCD’s output file won’t exactly contain that string.
To retrieve the original string, OpenOCD’s output file will have to be parsed. We’ll use the
itmdump program to perform the parsing as new data arrives.
You should have already installed the itmdump program during the installation chapter.
In a new terminal, run this command inside the /tmp directory, if you are using a *nix OS, or from
within the %TEMP% directory, if you are running Windows. This should be the same directory from
where you are running OpenOCD.
NOTE It’s very important that both
itmdumpandopenocdare running from the same directory!
$ # itmdump terminal

$ # *nix
$ cd /tmp && touch itm.txt

$ # Windows
$ cd %TEMP% && type nul >> itm.txt

$ # both
$ itmdump -F -f itm.txt
This command will block as itmdump is now watching the itm.txt file. Leave this terminal open.
Make sure that the STM32F3DISCOVERY board is connected to your computer. Open another terminal
from /tmp directory (on Windows %TEMP%) to launch OpenOCD similar as described in chapter 3.
Alright. Now, let’s build the starter code and flash it into the microcontroller.
We will now build and run the application, cargo run. And step through it using next.
Since openocd.gdb contains the monitor commands in openocd.gdb OpenOCD will redirect
the ITM output to itm.txt and itmdump will write it to its terminal window. Also, it setup
break points and stepped through the trampoline we are at the first executable
statement in fn main():
~/embedded-discovery/src/06-hello-world
$ cargo run
    Finished dev [unoptimized + debuginfo] target(s) in 0.01s
     Running `arm-none-eabi-gdb -q -x ../openocd.gdb ~/embedded-discovery/target/thumbv7em-none-eabihf/debug/hello-world`
Reading symbols from ~/embedded-discovery/target/thumbv7em-none-eabihf/debug/hello-world...
hello_world::__cortex_m_rt_main () at ~/embedded-discovery/src/06-hello-world/src/main.rs:14
14          loop {}
Loading section .vector_table, size 0x194 lma 0x8000000
Loading section .text, size 0x2828 lma 0x8000194
Loading section .rodata, size 0x638 lma 0x80029bc
Start address 0x08000194, load size 12276
Transfer rate: 18 KB/sec, 4092 bytes/write.
Breakpoint 1 at 0x80001f0: file ~/embedded-discovery/src/06-hello-world/src/main.rs, line 8.
Note: automatically using hardware breakpoints for read-only addresses.
Breakpoint 2 at 0x800092a: file /home/wink/.cargo/registry/src/github.com-1ecc6299db9ec823/cortex-m-rt-0.6.13/src/lib.rs, line 570.
Breakpoint 3 at 0x80029a8: file /home/wink/.cargo/registry/src/github.com-1ecc6299db9ec823/cortex-m-rt-0.6.13/src/lib.rs, line 560.

Breakpoint 1, hello_world::__cortex_m_rt_main_trampoline () at ~/embedded-discovery/src/06-hello-world/src/main.rs:8
8       #[entry]
hello_world::__cortex_m_rt_main () at ~/embedded-discovery/src/06-hello-world/src/main.rs:10
10          let mut itm = aux6::init();

(gdb)
Now issue a next command which will execute aux6::init() and
stop at the next executable statement in main.rs, which
positions us at line 12:
(gdb) next
12	    iprintln!(&mut itm.stim[0], "Hello, world!");
Then issue another next command which will execute
line 12, executing the iprintln and stop at line 14:
(gdb) next
14	    loop {}
Now since iprintln has been executed the output on the itmdump
terminal window should be the Hello, world! string:
$ itmdump -F -f itm.txt
(...)
Hello, world!
Awesome, right? Feel free to use iprintln as a logging tool in the coming sections.
Next: That’s not all! The iprint! macros are not the only thing that uses the ITM. :-)